

A full bathroom remodel moves in a clear order: plan, lock the layout, demo, rough-in by licensed trades, inspection, waterproofing, tile, fixtures, glass, and walkthrough. Tile is not a separate finish added at the end. Tile shape, size, and layout affect decisions made weeks earlier.
A common picture on demo morning looks like this. The old tub is out before noon. Then the floor tells the truth. Old patch lines show. A soft spot appears near the tub edge. None of that is a disaster by itself. It is information. A calm remodel treats demo day as a check on the plan, not as a race to cover the room again.
I am Andzhei. I install tile for bathroom remodels across Greater Seattle under Ability Tiles. My part is the tile-led finish: layout, prep, waterproofing where tile will sit, tile, grout, and sealant at plane changes. Plumbing and electrical rough-in belong to licensed trades for that work. The sequence still has to fit together, or the finish pays for it.
The morning the old bathroom came out
Demo reveals what photos cannot. Wall board may hide old leak marks. Floor layers may be thicker than expected. Old tile may sit on a base that cannot stay. The first task is not speed for its own sake. The first task is a clean, safe opening and a clear look at what remains.
What shows up after demo decides the next move. Rot gets removed. Loose material gets removed. A flat, sound base stays. A base with movement does not get buried under new tile.
Before anyone swings a hammer
Planning starts with use. Who uses the room? Is storage short? Is the shower hard to enter? Does the floor feel cold, tight, or hard to clean? Those answers point to layout changes that matter and changes that only add cost.
Measure the room twice. Note door swing, window height, vent path, and the height from floor to ceiling. Photograph every wall. Mark studs, pipes, and wires when walls open later, but do not guess at hidden runs before demo.
A good plan also names the finish early. Tile size changes layout. A large tile needs flatter walls. A small mosaic needs a different floor plan. My bathroom remodel in Greater Seattle work starts with that link between the room and the tile that will finish the room.
Lock the layout first
Layout comes before rough-in. Toilet position, vanity width, tub or shower footprint, drain spot, valve height, niche spot, and bench spot all tie together. A niche placed without a tile plan can land on a grout line in the worst spot. A valve placed without tile thickness in mind can sit too deep or too proud.
Decide whether plumbing stays in place or moves. A move can solve a bad layout. A move also adds trade work, inspection scope, and time. Keep a move only when the finished room gains real use from it.
For scope language and room types, see bathroom renovation. Read it as a planning check, not as a promise that every room needs the largest scope.
Order the long-lead pieces early
Tile, vanity, fixtures, valves, drains, and glass can set the calendar. A back-ordered valve trim can hold up a finished wall. A vanity that arrives late can hold up final plumbing and caulk lines. Order early, then confirm rough-in parts match the trim that will sit on the wall.
Demo and site prep
Demo should leave a room ready for inspection of the base. Remove old tile, board, fixtures, and floor layers that cannot support the new finish. Keep what is sound and code-compliant. Remove what is soft, loose, mold-damaged, or out of plane.
In a pre-1978 home, pause before disturbing painted surfaces. The EPA Lead Renovation, Repair and Painting Program sets lead-safe duties for renovation work that disturbs paint. That rule is not paperwork for its own sake. Older paint can turn demo dust into a health risk.
Rough plumbing and electrical
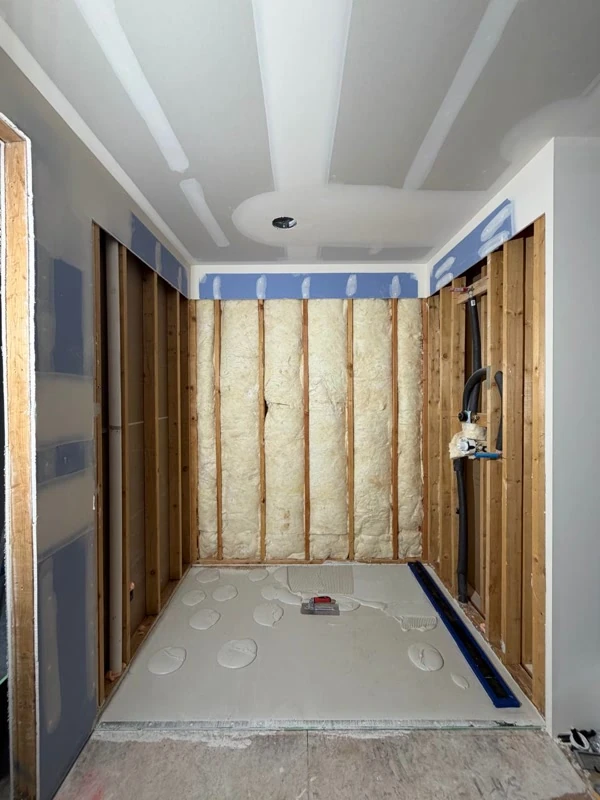
Rough-in moves pipes, drains, supplies, wires, boxes, and venting to match the locked layout. Licensed plumbers and electricians do that trade work. Tile planning still speaks early here: drain type, valve depth, niche framing, bench height, and heated or lit add-ons all affect the tile that follows. I do not present that trade work as mine.
Keep walls open after rough-in. Take photos with a tape in frame. Those photos help later when a grab bar, cabinet, or accessory needs solid backing and no one wants to guess where a pipe sits.
If the plan changed during demo, change it on paper now. A small layout shift is easy with open walls. The same shift is costly after board and membrane.
The inspection pause
The pause is part of the job. Required inspections check rough work before walls close. Closing early can mean opening again later, and tile should never be the layer that has to be torn out to prove hidden work.
Seattle explains permit triggers and exemptions on Do You Need a Permit?. Rules vary by city in Greater Seattle, so confirm the local path before work starts. Even when a permit path is light, code still applies.
Use the pause well. Confirm backing, blocking, fan ducting, and valve height. Confirm the shower floor plan and drain type. Then close walls.
Waterproofing before tile
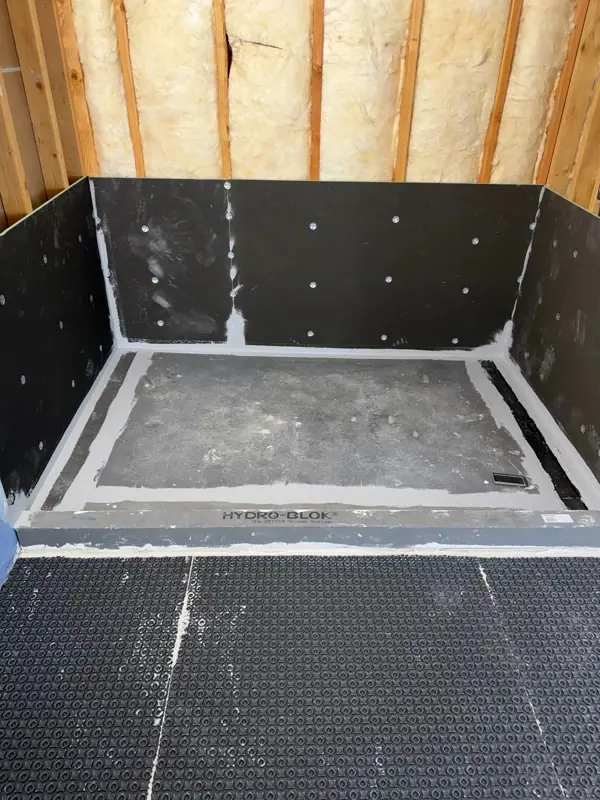
Tile and grout are a finish, not a waterproof layer. Water passes through grout and finds seams. A shower needs a continuous waterproof system behind and under tile, tied to the drain and carried through corners, curbs, niches, and benches.
Board goes up flat and secure. Seams get treated per the system in use. Membrane goes on in full coverage, not in patches. Cure time matters. Tile on a wet or uncured base is a shortcut with a long memory.
This step stays quiet in photos. It decides how long the shower lasts.
Tile goes in
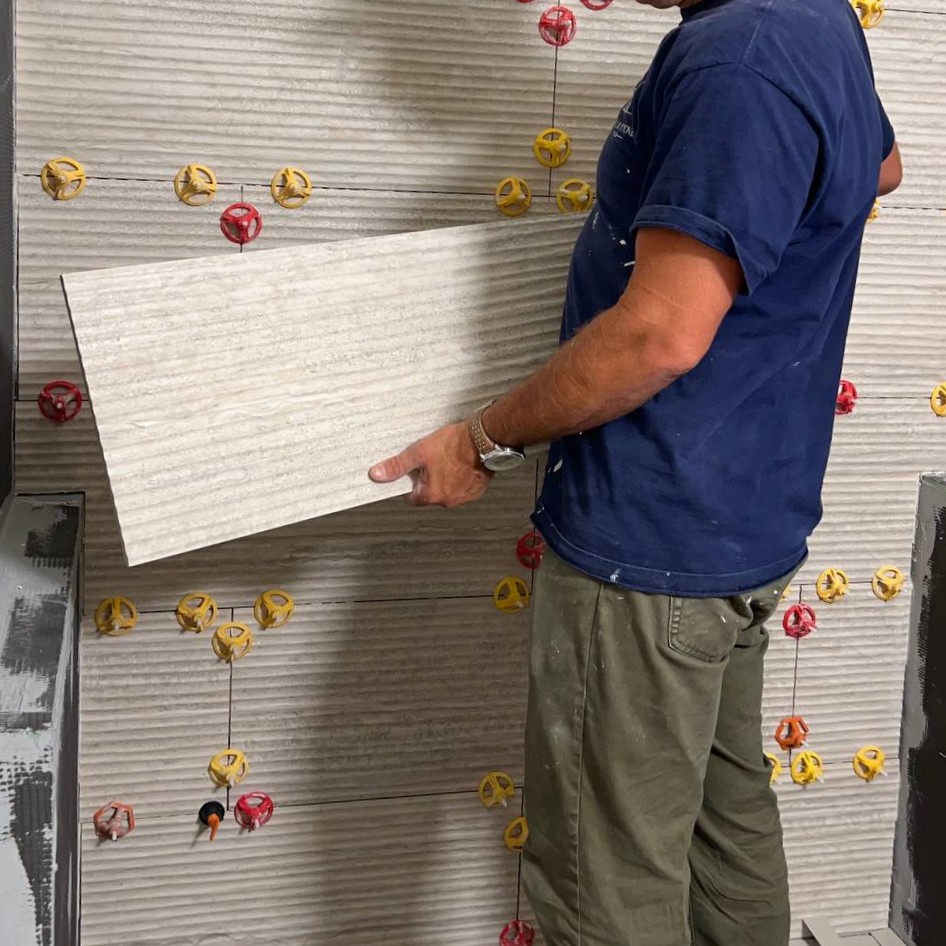
Tile starts with layout lines, not with the first box opened. Find center lines that matter from the door view. Balance cuts at edges. Keep grout lines running clean through the room where the design calls for it. A layout that serves the room looks calm because cuts land with intent.
Set the shower in a working order that protects finished faces. Floors, walls, niches, and benches each need full mortar support and clean edges. Large tile needs flat prep and careful handling. Small tile needs a true plane so sheets do not telegraph bumps.
For depth on materials and shower finish, read bathroom tile and remodel work. Use that page to compare tile scope before a visit.
Paint, vanity, and fixtures
Paint comes at a point that protects tile and still lets walls finish clean. Vanity and countertop go in after floor tile and grout have cured enough for safe work. Fixtures follow in an order set by the licensed trades on that scope, with trim depth checked against finished tile.
Ventilation belongs in this finish talk too. ENERGY STAR lists Ventilation Fans that use less energy and run with less noise. A quiet fan gets used. A loud fan gets left off, and moisture stays in the room.
Glass, final touches, and punch list
Glass gets measured on finished tile. A curb, wall, or bench that changed by a grout line can change glass fit. Measure after tile, then wait for fabrication. That wait is normal and planned.
Final touches include sealant at plane changes, clean grout haze removal, and a check of every edge. Make a punch list in daylight. Look at grout lines from standing height and from the door. Check niche shelves for standing water. Run water and watch drain flow.
Walkthrough and what to keep
Walk the room slowly. Open and close the door. Check vanity drawers against trim. Confirm spare tile, grout type, and sealant color are written down. Keep valve and fixture model numbers with house records.
Clean tile with mild products. Skip harsh acid on new grout. Reseal grout only if the grout type calls for it. Keep sealant joints in view twice a year; a cracked joint is a quick fix, while water behind tile is not.
Planning a remodel in Greater Seattle? Request a visit and share photos, room size, and the layout change under review.